
Brand Mascot & IP
Inside a 4-Meter Esports Mascot Sculpture: From Concept to Delivery
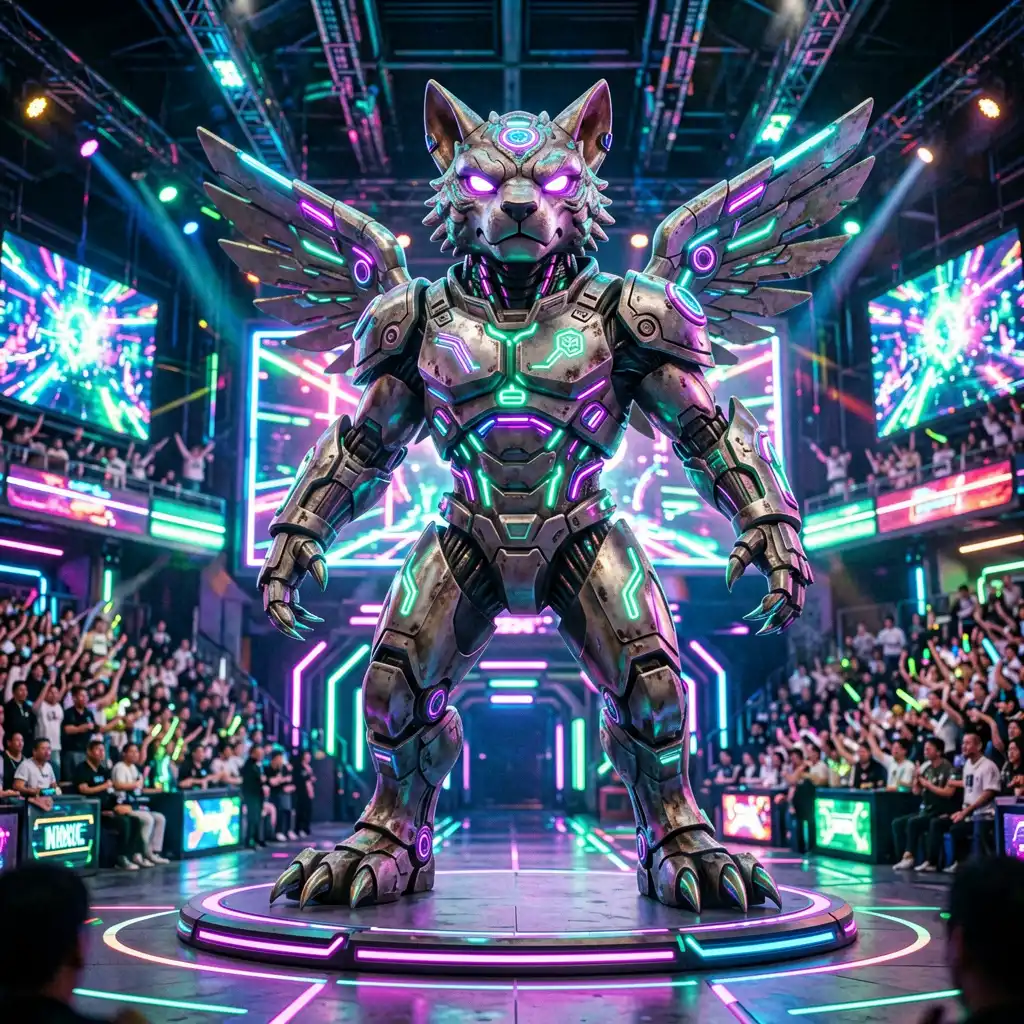
We Built a 4-Meter Gaming Mascot for an Esports Brand — Inside the Custom IP Character Sculpture Process from Concept to Delivery
So here’s the thing about custom IP character sculptures: they’re not like regular sculptures. You can’t just sculpt something cool and call it done. When an esports brand asks you to bring their gaming mascot to life in 3D, you’re not building a sculpture — you’re building a brand asset, a photo magnet, an event centerpiece, and sometimes a viral marketing tool all at once. For more detail on the production and engineering stages, read Custom Sculpture Manufacturing: 7-Step Process Guide.
I want to walk you through the full process of how we built a 4-meter custom gaming mascot for an esports brand. Everything from the initial concept handoff to the final reveal on stage at a major gaming event. This is the behind-the-scenes look I wish I’d had before I started doing this kind of work.
The Brief: When a 2D Character Needs to Become 3D
The client came to us with a challenge common in the esports world: they had a well-loved brand mascot — a cybernetic fox character that existed only as 2D artwork. It was their logo, their loading screen character, their social media avatar. But they needed a physical version for their booth at a major gaming convention.
Why IP Sculptures Are Different from Regular Sculptures
This is the first thing I tell any client coming from the gaming/animation world: a 2D character designed for screens has features that don’t work in 3D. The proportions that look great on a loading screen look weird in physical space. The flat-shaded colors that pop on a monitor don’t translate to physical materials. The action pose that reads perfectly in a still image looks unstable when you have to engineer it to stand on its own.
The Translation Challenges We Faced
| Challenge | 2D Design | 3D Reality | Our Solution |
|---|---|---|---|
| Head-to-body ratio | Exaggerated cartoon proportions (1:3 head to body) | Looked like a Funko Pop — cute but not imposing at 4m | Gradually scaled down the head-to-body ratio to 1:4.5, keeping the cartoon feel while making it read as a “serious” mascot at convention scale |
| Overhanging pose | Character leaping forward, arm extended | Center of gravity was outside the base — physically impossible without support | Redirected the forward lean, added a translucent support strut designed to match the character’s energy trail |
| Flat color zones | Solid color fills with no texture | Looked cheap and plastic-like at 4m scale | Added subtle surface texture variations — micro-pitting on the metallic areas, satin finish on fabric areas, gloss on “energy” elements |
| Fine details (eyes, logos, circuitry) | 1-2mm line art | Invisible from 5m away | Scaled all detail elements by 3-4x, added depth (actual grooves instead of painted lines) |
Phase 1: Concept to 3D Model — The “Conversation Phase”
This is the most underrated part of the process. The client has their 2D artwork. We have our 3D modeling expertise. Reconciling the two takes real collaboration.
Step 1: The Turnaround Sheet
We asked the client for something they didn’t have: a full turnaround sheet showing the character from all angles. Most 2D artwork shows the character from one or two angles at most. To build a 3D sculpture, we need to know what the back of the head looks like, what the underside of the arm looks like, how the tail connects.
When they couldn’t provide it, we created draft concepts — essentially our best interpretation of what the unseen angles would look like. This took 3 rounds of revisions before the client was satisfied.
Step 2: Digital Sculpting in ZBrush
Once we had concept approval, we moved to digital sculpting. This is where the real magic happens. Our sculptor built the character in ZBrush at full 4m scale in the digital environment, which let us:
– Test the silhouette from every viewing angle
– Identify structural weak points
– Plan the internal armature
– Pre-visualize lighting effects
– Calculate material requirements
This phase took about 2 weeks and produced a model accurate to within 2mm of the final piece. That’s not bragging — it’s essential. Any mistake caught here costs hours in software. The same mistake caught after mold-making costs thousands in material.
Step 3: Final Approval Before Production
We rendered the digital model from every angle the convention attendees would see it — including the VIP lounge view from above, the stage view from below, and the booth view from 10m back. The client signed off on the 3D model, and we moved to production.
Phase 2: The Engineering Challenge — Making a 4m Character Stand
This is where most people don’t realize how complex IP sculptures get.
Internal Armature Design
A 4m fiberglass sculpture weighs roughly 200-350kg depending on wall thickness and armature. The internal support structure needs to be:
Structural steel core: A welded frame of steel tubing that exactly follows the character’s internal shape. This is the skeleton.
Weight distribution: The base plate needs to be wide enough that the sculpture can’t tip, even with enthusiastic fans leaning on it. For our 4m cybernetic fox, the base plate was 1.5m x 1.5m in a 12mm steel plate.
Disassembly points: The sculpture needed to fit through a standard shipping container and a convention hall loading dock. We designed it in 4 sections: base + legs, torso, head, and extended arm. Each section has hidden bolt flanges with alignment pins.
Material Selection
For a high-traffic esports convention piece, FRP (fiberglass reinforced plastic) was the clear winner:
Why FRP over alternatives:
| Material | Pros | Cons | Verdict |
|———-|——|——|———|
| FRP | Lightweight, paintable, durable, repairable | Less rigid than metal at thin walls | BEST for this use |
| Stainless steel | Extremely durable, premium feel | Very heavy (800kg+ for 4m), expensive, limited color options | Overkill for indoor mascot |
| Resin casting | High detail reproduction | Heavy, brittle at large scale | Good for small props only |
| Foam | Lightest option | Too fragile for convention traffic | Rejected for durability |
We used a 4-layer fiberglass laminate with a gel coat finish — structural enough for the 4m height but light enough for two people to handle each section during assembly.
Phase 3: Sculpting, Molding, and Casting
This is where the sculpture goes from digital to physical. It’s the longest phase of the project.
Clay Sculpting
We printed the 3D model as a reference guide and built the full-size clay maquette around the steel armature. The clay stage is critical because it lets our sculptor refine the surface — adding the micro-textures that read as “real” rather than “plastic.”
For our cybernetic fox, this stage took 3 weeks:
– Week 1: Rough blocking of all mass and forms
– Week 2: Detail work — fur texture, cybernetic panel lines, eye sockets
– Week 3: Surface refinement, final approval from client on actual physical surface
Mold Making
The clay model was sectioned into 4 mold segments (matching our disassembly plan). Each segment got a fiberglass mother mold for support. The mold-making process took another 2 weeks.
Casting the FRP
Each mold was laid up with 4 layers of fiberglass mat and polyester resin. The gel coat was applied to the mold surface first, giving us the color-matched surface directly. Cure time was 24 hours per section.
Total casting time: 1 week for all 4 sections.
Phase 4: Surface Finishing — Where the Magic Really Happens
Raw FRP looks like a boat hull. The finishing is what makes it a character.
Our Painting Process
Primer: Two coats of automotive high-build primer. Sanded smooth between coats.
Base colors: The client’s brand colors were matched using a spectrophotometer reading of their digital assets. This sounds simple but took 3 test panels to get right — monitors display colors differently than physical paint.
Detail painting: The cybernetic panel lines, eye glows, brand logos, and circuit patterns were all hand-painted by our finishing artist. This took 1 week alone.
Clear coat: Two coats of automotive-grade 2K clear coat with UV stabilizers. This protects the paint from handling damage during the convention and allows for cleaning between event days.
Final assembly and touch-up: The 4 sections were bolted together, seam lines were filled and repainted, and the entire piece got a final inspection.
Phase 5: Transport and On-Site Assembly
This is the part nobody sees but everyone should plan for.
Logistics
The 4 crated sections took up 12 cubic meters in a temperature-controlled truck. We shipped from our workshop to the convention city 3 days before the event.
On-Site Assembly
Team of 3 people, 6 hours to assemble:
1. Base plate positioned and leveled (45 min)
2. Legs and lower body mounted to base and aligned (1.5 hr)
3. Torso section hoisted and bolted (1 hr)
4. Head section lifted into place, connections made (1 hr)
5. Extended arm attached, balance verified (45 min)
6. Touch-up painting on seam lines, final lighting test (1 hr)
Phase 6: The Reveal and Beyond
The sculpture was unveiled on the main stage of the convention. The client had arranged for dramatic lighting, fog machines, and a countdown video. The crowd reaction was everything we hoped for — phones out, photos taken, people lining up for selfies.
After the Event: Storage and Reuse
One thing I love about FRP sculptures: they’re reusable. After the convention, the mascot was shipped to the brand’s headquarters for lobby display. With proper care, it’ll last 10-15 years indoors. If they want to bring it to another event, it breaks down into the same 4 sections and ships again.
FAQ: Questions I Get About Custom IP Sculptures
How much does a 4m custom character sculpture cost?
For a full custom IP character at this scale, clients typically budget $25,000-$45,000 depending on detail complexity, paint finish requirements, and timeline. The largest cost driver is the sculpting and mold-making (about 50% of total).
How long does the process take from concept to delivery?
For a 4m piece like this: 10-14 weeks total. Breakdown: Design and 3D modeling (2-3 weeks), clay sculpting (3-4 weeks), mold making (2 weeks), casting (1 week), finishing (2-3 weeks), logistics (1 week).
Can you replicate the same character multiple times?
Yes — once the mold is made, we can produce additional copies. The initial sculpture (design + sculpting + mold) is the expensive part. Replicas from the existing mold cost roughly 30-40% of the original. This is popular for brands that want mascots at multiple locations. Our IP sculpture portfolio has several examples of characters that were replicated for multi-city campaigns.
What about 3D scanning for existing characters?
If you already have a physical model, toy, or prototype, we can 3D scan it and scale it up. This is actually faster and more accurate than sculpting from 2D art. We’ve used this approach for characters that started as small resin figurines or existing 3D prints.
Can the sculpture include lighting or animatronics?
Absolutely. Our 4m mascot had LED-lit eyes and cybernetic panel glow effects using battery-powered LED strips with diffuser panels. We’ve also done animatronic elements (blinking eyes, moving arms) for other projects, though that adds significant cost and complexity. Our public art projects show a few examples of how we integrate lighting into larger installations.
What’s the weight limit for a convention hall floor?
Most convention halls have floor load ratings of 100-150 PSF (pounds per square foot). Our 4m FRP mascot with steel base plate distributed roughly 80 PSF — well within spec. This is one area where choosing FRP over other materials really pays off: a stainless steel version would have been twice as heavy and potentially exceeded floor limits.
How do you handle IP rights?
We work under a standard commission agreement: the client retains all IP rights to their character. We sign NDAs and never use the designs for other projects. Our molds are destroyed or transferred to the client after production, depending on the agreement.
Building a 4m gaming mascot for an esports brand was one of the most challenging and rewarding projects I’ve worked on. The intersection of character design, structural engineering, and event marketing creates a unique set of challenges that most sculptors never have to deal with. For more detail on the production and engineering stages, read How Custom Sculptures Are Made: From Concept to Installation in 10 Steps.
If you’re an esports brand, game studio, or IP holder considering a physical mascot, our IP sculpture projects show the range of what’s possible. And if your character needs to live in a public space — convention center, game studio lobby, or gaming arena — these public art installations demonstrate how we handle the engineering and installation challenges at scale.
J
Written by James Liu
James Liu is Project Manager at Y Sculptures, specializing in end-to-end custom sculpture project delivery for commercial, hospitality, and public art sectors. With 12 years in the industry, James coordinates design approvals, material sourcing, fabrication timelines, international shipping logistics, and on-site installation. He has successfully delivered 500+ projects to 30+ countries.
Related Projects
Browse real projects matching this topic
Related Insights
Continue reading related articles
Brand Mascot & IP
Jun 11, 2026
One-Off vs Batch Production: Choosing the Right Model for IP Character Sculptures
Our Sculpture Solutions
Explore our full range of custom sculpture services

IP Character Replication
Learn More →

Large Sculpture Custom
Learn More →

Original IP Development
Learn More →

Solutions Services
Learn More →

Custom Inflatables
Learn More →

FRP & Fiberglass Sculpture Manufacturing
Custom FRP and fiberglass sculpture manufacturer - design, fabrication, and finishing.
Learn More →
Stainless Steel & Metal Sculpture Manufacturing
Custom stainless steel, bronze, corten, and aluminum sculpture manufacturer.
Learn More →
Theme Park Sculpture Services – Custom Amusement Park Statues
Custom Theme Park Sculptures – Bringing Imagination to Life Theme parks, amusement parks, zoos, and entertainment destinations thrive on immersive...
Learn More →
Commercial Sculpture Services – Custom Brand Mascots & Mall Art
Custom Commercial Sculptures – Elevate Your Brand & Space In today's competitive retail and commercial environment, first impressions matter. Commercial...
Learn More →